The chargecooling system is comprised of several components:
- Chargecooler (water/air intercooler)
- Pump
- Radiator
- Coolant header tank
- Interconnecting hoses
Esprit models with a chargecooler include 89.5MY to 93.5MY Esprit SE; 93MY to 95MY Esprit S4; 96MY to 96MY Esprit S4s, and 96MY to 99MY Esprit GT3.
Starting with cars built in December 1993, a change was made to the chargecooling system. Prior to this date, The chargecooling system was fully independent from the engine cooling system. These cars can be identified by the presence of two black metal coolant header tanks side-by-side. The larger tank being for engine cooling and the smaller for the Chargecooler. After the change date, the two systems were integrated into one. These cars have one common frosted white plastic header tank which supplies the coolant for both purposes.
On a Difficulty Scale of 1 to 10, this procedure rates a
2.
![]()
![]()
**Note: Click on any photo to see a larger image. Click the Back button on your browser to return to this page.
Procedure
| 1 | Set the heater temperature control to fully hot. |
| 2 | On cars with the plastic header tank only, clamp off the smaller diameter air bleed hose between the rearmost hose spigot on the chargecooler (#3 in figure below) and the "T" at the bottom of the header tank. |
| 3 | Remove the fill plug at the top of the chargecooler (#4 in figure below) and fill the chargecooler with a 50% solution of coolant and distilled water. Only use distilled water when combining with coolant. This will reduce deposit buildup in the cooling system. Note that removing the fill plug may be difficult because the charge cooler rests on rubber mounts that makes it hard to get good torque on the plug. |
|
|
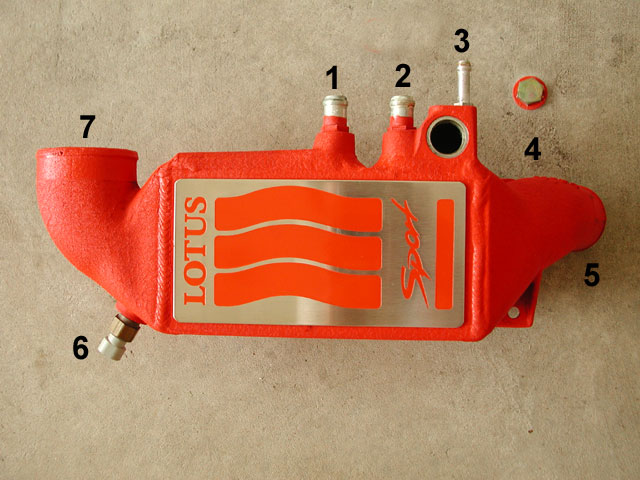
The chargecooler is located on top of the intake cam tower on the left top side of the engine. The plate on the top may be stamped or painted with the words "Lotus Chargecooler" or "Lotus Sport" depending on the model (SE, S4, S4s, GT3, or Sport300). Regardless of the plate, they are all identical. The connections on the chargecooler are: 1) Coolant Inlet SPigot; 2) Coolant Outlet Spigot; 3) Air Bleed Hose Spigot; 4) Coolant Fill Hole and Plug; 5) Air Intake from Turbo; 6) Mass Air Temperature (MAT) Sensor; 7) Air outlet to Intake Plenum. |
| 4 | Remove the pressure cap from the smaller header tank in twin tank systems or from the plastic header tank in single tank systems. Top off with coolant solution to the fill line. |
| 5 | Start the engine and while running at idle, top off the chargecooler and header tank as needed until the level doesn't drop off anymore. |
| 6 | Shut off the engine and replace the fill plug and pressure caps. Then remove the hose clamp if the car has a single tank system. |
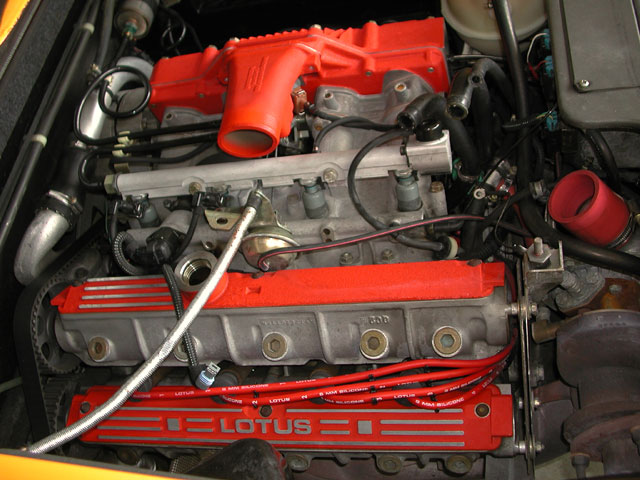
| This picture shows the engine with the chargecooler removed. Note the connections to the turbo, intake, coolant hoses, as well as the wiring to the MAT sensor. |
|
| 7 | Check the plastic expansion tank behind the left rear wheel arch. It should be partly filled. Add coolant solution to this tank if necessary. |
| 8 | Test drive the car. |
| 9 | Wait for the engine to cool and then check the level in the header tank. Top off if needed. |
| 10 | Make sure the expansion tank contains a small amount of coolant solution. |