Installing the Lotus-Momo Design Wheel
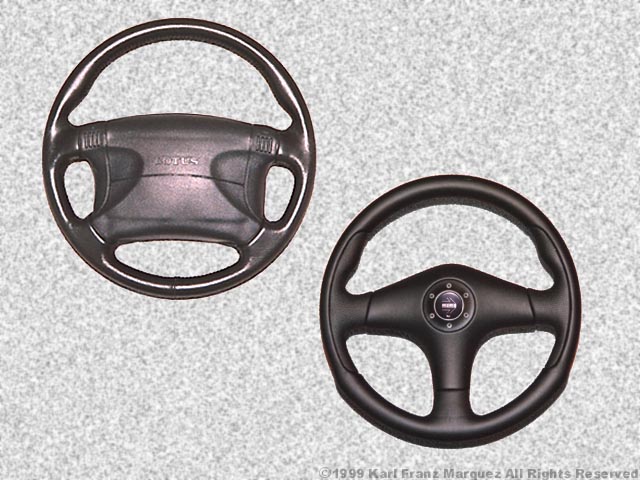
Originally, Lotus used nice, thick-rimmed steering wheels from Italian manufacturer Nardi for the Esprit. Then came the early nineties, and airbag (SIR) systems became mandatory in the USA. Being a small car company of limited resources made designing their own unit cost-prohibitive. They solved this problem by "borrowing" a unit from parent company, GM. The problem is that Lotus got the most awful looking piece of safety device from the GM parts bin. Ten years later, even though GM ownership is no longer, Lotus continues to use this ugly appendage to the Esprit's steering column.
Although it has a stitched rim, you will discover upon close inspection that the GM wheel is made of imitation leather. This looks totally out place in a supercar with Connolly leather throughout its interior. To make matters worse, in many newer vehicles the wheel and airbag cover are dyed medium gray. This means that , except for cars with gray (raven) interiors, the wheel clashes with the rest of the car's interior which has black switch gear and trim.
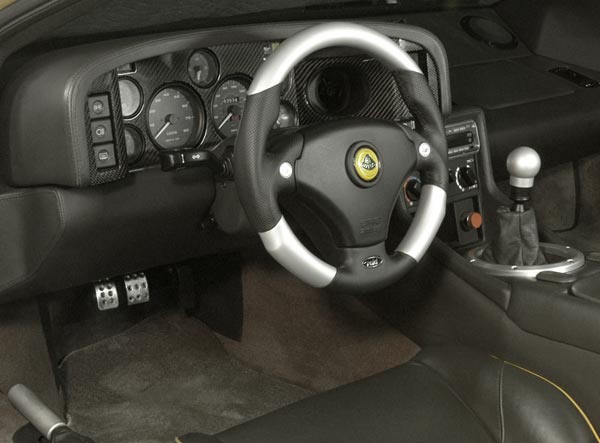
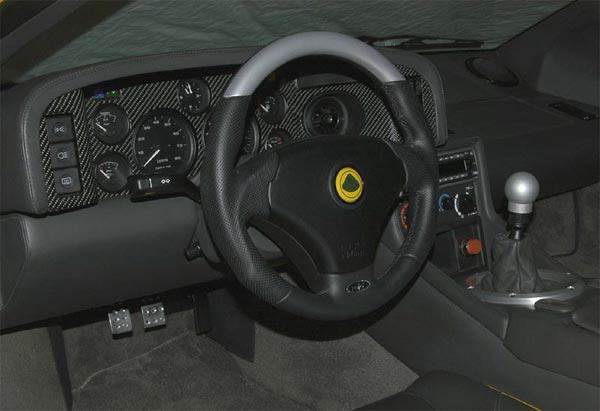
Meanwhile, newer Esprit variants such as the GT3 and V8-GT, which aren't available in the USA market, are graced with one of the prettiest Momo steering wheels ever designed. It just isn't fair!
Seeing pictures of what the non-SIR Esprits included as standard equipment, I set out on a quest to find out how to substitute my ugly duckling for a proper Momo wheel.
Well, I finally did it. Someone, who shall remain nameless, has helped supply me with the proper parts and now that yucky, ugly GM SIR steering wheel is history. In the process of replacing it I have learned a few interesting things:
- The Momo wheel is about 1/2 inch smaller in diameter than the airbag one. This mean that you have slightly more thigh room or room when working in the "lotus" position underneath the dash.
- The Momo wheel is definitely thicker and better feeling, but the thicker, smaller diameter rim obstructs the gauges a bit more.
- The Momo wheel is only available through Lotus. As I have pointed out before, Lotus has agreements with many of its suppliers (Momo, OZ, Brembo...) that prevent you from buying the parts directly from the manufacturers. Momo representatives told me that this wheel was designed specially for Lotus and is not available in the aftermarket. The Lotus "list" price is currently $763US. Yikes!
- Taking off the GM wheel makes it evident that it is very poorly built. The rim is wrapped in imitation leather that is hand-stitched to make it look more real. The airbag unit doesn't fit squarely into the wheel. Underneath the airbag, torn-off pieces of masking tape are used to hold the wiring in place. Certainly not the kind of stuff you expect to find in a $100,000US supercar.
- The poor quality of the GM wheel is really evident in it's flimsy horn buttons. These have got to be the cheapest piece of crap switches known to man. They are made out of a very brittle, clear plastic. I have probably used my horn only one or two dozen times, yet I found both buttons cracked and they practically disintegrated in my hands. The horn button on the Momo wheel is in the proper position on the center of the crash pad. This makes it easier to press than the ones on the spokes of the airbag wheel, or the one on the end of the turn signal stalk in older Esprits. Also, I don't know how but Momo managed to keep their logo on the horn switch. Older Esprits with Nardi wheels required the Lotus badge instead.
- I'm surprised at just how heavy the SIR wheel package is. At just about 10 pounds, it definitely doesn't seem fitting on a car from a company famous for lightweight vehicles. By contrast, the Momo wheel probably weighs about 3 to 4 pounds.
- Removing the airbag is a nerve wracking experience. I kept fearing that thing would explode in my face and kill me. I followed the steps in the manual, but it's still scary. I'm not exactly sure how I'm supposed to store the airbag unit. I suppose a cool, dry place is called for, but I'm not sure I want that explosive device inside my house. Make sure you follow all safety precautions if you choose to replace your wheel. These are indicated in the owner's handbook.
- Removing the existing wheel is (as most things Lotus) an exercise in frustration. The Service Notes warn in several places not to apply too much force while attempting to pull the wheel off because it can permanently damage the collapsible steering column. It says that if it doesn't let go with a small wiggle, then you should use an "appropriate" steering wheel puller. Problem is there is no place to attach a standard steering wheel puller. There are two holes that could be used if only they had been threaded as in most other wheels. There is nothing else to grab onto to pull the wheel off. The parts list did not indicate a special Lotus tool either. I finally removed the wheel by fabricating my own custom puller that attached to the airbag fixing screws. A perfect example of a 10-minute job that took all day because it was on a Lotus.
- Underneath the wheel is an interesting device that is used to maintain the horn and airbag connections as the wheel rotates. It is aptly named a "rotary connector" in the Parts List. This unit has to be removed which requires that you remove the upper and lower (leather) steering column shrouds.
- If you look at the Parts List you'll notice that there is a different part number for the shrouds depending on whether or not the wheel has an airbag. It appears the only real reason for this is that the non-airbag shroud extends a little further towards the wheel, thus covering the boss (hub) better. If you don't switch to the other shroud, a gap of about 1/4 inch is exposed around the boss. No big deal.
- The Parts list also has different parts numbers for the turn signal (indicator) and windshield washer column switches on SIR vs. non-SIR cars. However, according to Lotus, the only difference between the SIR and non-SIR parts is the length and bend of the switch arm itself. It is definitely not necessary to exchange it.
- On the Momo wheel, the tolerance of the lug on the wheel boss in relation to the nylon plunger on the turn indicator switch is critical. In some cases, the corner of the lug may need to be filed to form a sharp edge, the better to operate the plunger. Otherwise, the turn signal isn't cancelled after completing a turn and you run the risk of looking like so many (elderly) Florida drivers who appear to drive in circles all day because they leave their turn signals on all the time.
- The horn connects a little differently than in the SIR model because the rotary connector is no longer there. Instead there is a spring-loaded pin that presses against a metal ring on the back of the hub. The connection then goes to the horn switch and back to the steering column which is grounded to complete the circuit. I had to improvise a bit to get this connection made, because the wire coming from the harness to the horn pin isn't included on SIR vehicles.
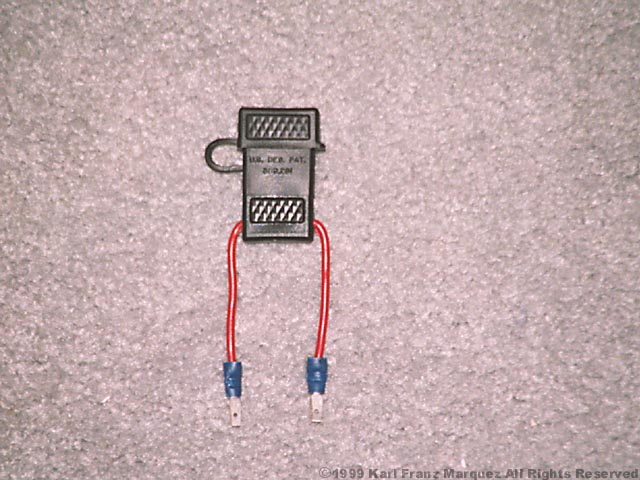
- I wanted to keep the passenger airbag functional so I had to figure out how to keep the SIR tell tale from lighting up all the time. I didn't want to simply remove the bulb, because then I wouldn't know if the passenger side had a fault. Since the airbag unit only uses two wires (a third wire in the connector is for the horn), I figured that I could connect the two wires with a variable resistor and then change the resistance values until the CPU believed there is an airbag in place. I tried my little experiment with a 25 ohm rheostat because I assumed the resistance of the airbag would be very low. I started at 25 ohms and slowly reduced the resistance value until the light went out. This happened at about 2.2 ohms. Once I had the correct value, it was simply a matter of replacing it with a fixed value resistor (you can use Radio Shack part #271-1121) and voila, no more annoying tell tale light. To make the installation look more professional, I bought an inline fuse holder from Radio Shack as well (part # 270-1213). I then trimmed and bent the ends of the resistor and inserted it into the fuse holder. I trimmed the length of the wires from the fuse holder and attached crimp connectors that match the one on the airbag connector. Here's a picture of what the device looks like.
- Finally, I did a little research on the Internet regarding the laws about removing airbags. If one is to believe what one reads on the internet, what I learned was this:
You can remove or disconnect/disable the airbag on your own vehicle as long as you replace it when you sell the vehicle or notify the buyer that the airbag is not operational. All those things you hear about having to request that the government grant you permission to disable the unit have to do with having someone disable the unit for you. Even if you did manage to be one of the few who got approval to get the airbag disabled, you will probably have a hard time finding someone who will do the job. The reason is that there is too much liability at stake. Most shops are afraid they will get sued if you're in an accident and your airbag wasn't functional, even if you requested it this way.
Remember, this is all info I read on the Internet, so it's validity is questionable. If you get hurt because your airbag didn't deploy, don't come saying that I said it was OK.
For more pictures of the process of exchanging the wheel, refer to my S4s picture gallery.
Most of the parts needed (except for the horn pin,
bush, and spring) are available from Lotus as one unit. The individual
parts don't have published part numbers yet. Here's a list of all the
parts needed to replace your wheel: Keep in mind that items 11-15 are
optional and are for aesthetics only. You certainly don't need them.
| Item | Part Number | Description | Qty. |
| 1 | TBA | Horn button, Momo logo | 1 |
| 2 | TBA | Crash pad, steering wheel center | 1 |
| 3 | TBA | Collapsible bracket | 1 |
| 4 | TBA | Steering wheel only | 1 |
| 5 | TBA | Screw, fixing steering wheel to boss | 4 |
| 6 | TBA | Boss, steering wheel platform to column | 1 |
| 7 | TBA | Horn ring, push connection | 1 |
| 8 | A082H4080F | Momo steering wheel assembly (items 1-7 above) | 1 |
| 9 | A100M6048F | Column switch, LH, turn/dip/flash, Non-SIR | 1 |
| 10 | A100M6049F | Column switch, RH, windscreen wipe/wash, Non-SIR | 1 |
| 11 | A082V8685J | Column shroud, upper, trimmed | 1 |
| 12 | A082V8686J | Column shroud, lower, trimmed | 1 |
| 13 | A100U0279F | Extension stud, column shroud rear | 1 |
| 14 | A100W5143F | Screw, M4 X 12, lower shroud rear | 1 |
| 15 | A075W4063Z | Washer, lower shroud rear | 1 |
| 16 | A100H6013F | Horn pin | 1 |
| 17 | A100H6050F | Spring, horn pin | 1 |
| 18 | C100H0029F | Horn bush | 1 |
Installing a Raid Airbag Wheel
Back in 2003 I started on a quest to try to mount a replacement airbag wheel on the Esprit that would look more suitable than the hideous GM-Saturn wheel that came standard with the car. My search led me to a German manufacturer named Raid. For those not familiar, Raid is the aftermarket division of Atiwe. This is a German company that makes automotive products for several companies. One of their wheels is the standard steering wheel on the Aston Martin Vanquish.
For about a year, I dealt with some folks in Germany trying to organize a "group buy" for the USA folks on a Raid wheel for the Esprit.
Previously, the only way to buy the Raid steering wheels in the USA was through MotoConcept. However, they were quite pricy costing well over $1,300US and that was before the US dollar went plummeting and the exchange rate went through the floor. The MotoConcept package does include the required hub adapter to make the wheel work with the Esprit. They will not, however, sell just the adapter separately.
Due to this, fellow Esprit owner Jim Knowles took the task to make the required adapter. After purchasing the proper tooling and after a serious design study we came up with a batch of hub adapters that would work. Working in conjunction with my German partner Katja Riley, we were able to get a great deal on the Raid wheels and a group buy was organized. The wheel sold like hotcakes. In fact, after the first production run of 20 hub adapters, a second group buy was organized and most of that has been sold as well. If you are interested in puting one of these wheels on your Esprit, you can contact Jim at jknowles1@cfl.rr.com to purchase a hub adapter and get the contact details for Katja to order your wheel.
There are two basic styles of wheels available. The first is known as the Daytona. This is the same wheel found on the Vanquish. It is very thick-rimmed, black leather with silver accents that look just like the anodized aluminum in some of our cars. The wheel is 340mm in diameter which means that it is even smaller than the Lotus/Momo Euro wheel that many have on their cars now. This is good news for some as it gives you a bit more clearance in the thigh area when you drive. For comparison, the ugly GM/Saturn wheel is about 370mm and the Lotus/Momo wheel is 360mm.
Here's a small taste of what the Daytona looks like on my car. Keep in mind that the Lotus logo horn button was custom built and not on the production wheel. The horn buttons on the production wheels are the alloy buttons on the spokes at 3 and 9 o'clock and are conveniently under your thumbs.
The second wheel style is called the Freeway and it is very similar to the Daytona except that the horn buttons are concealed under the leather and the anodized look is only on the upper front portion of the wheel. The Freeway is a few bucks cheaper than the Daytona.
Here's a preview of what the new Freeway looks like mounted in my Esprit. Again, please note that the Lotus horn button is not standard.
The freeway can also be purchased with an imitation carbon fiber replacing the alloy look trim as seen here:
http://www.raid-rdi.com/deutsch/interieur/pics/gross/070133.jpg
or with black leather as seen here:
http://www.raid-rdi.com/deutsch/interieur/pics/gross/070135.jpg
For a very detailed set of instructions on how to install your Raid wheel, click here.